An Introduction
Need to upload your website? Or share files?
BulletProof FTP Client (BPFTP Client) is a fully automated FTP client, with many advanced features including automatic download resuming, leech mode, FTP search and much more. Perfect for personal or corporate Webmasters and Webdesigners as well as for Software and Music traders. Some of the most popular features are listed below.
- Download files in any order, from any directory on an FTP site.
- Automatically reconnect and resume from where it left off if the connection is lost, or no data is received for a specified period of time. This works with uploading as well!
- Browse the FTP site from the cache while off line or transferring - this does not open another connection to the FTP server like other FTP clients.
- List hidden files
- Leech mode - on FTP servers that have a specified limit that you can download.
- Bullet Proof FTP can disconnect, reconnect and keep downloading automatically when your download credit runs out.
- Monitor the clipboard, and when an ftp or http (web site) url is copied into it, it can instantly connect to the appropriate site in the background and start transferring.
- Queue files on more than one site for download.
- Proxy/firewall support
- HTTP downloading with support for redirected URLs
- Local file listing with rename/delete/make directory support
- Import site listings from Cute FTP, WS_FTP, and FTP Explorer. With Cute FTP and FTP Explorer, the passwords are also imported.
- Remote mirroring - BPFTP will automatically download new files, resume half-downloaded files, and skip files you already have. You can download entire sites.
- Windows-style file finding ability. ie, enter a wildcard and other details about a file, and BPFTP will search an entire FTP site and download every file that matches.
- Plus everything else you'd expect in an FTP client, and a few things you wouldn't. And its a very small download, NO extra support files/DLLs needed.
Your First Connection
We will use an example connection to one of our own FTP Servers here that has been created to allow you to learn the process of connecting to an FTP site and transferring files. The process once learnt, is the same for connecting to any server such as your ISP or webhost.
Note: The screenshots and UI specifics in this version of the manual refer to BulletProof FTP Client v3 Home Edition and BulletProof FTP Client v3 Professional.
- Downloading BPFTP Client
- Installing
- First Look
- The Site Manager
- Connecting
- Changing Directories
- Uploading
- Downloading
- Deleting
Downloading BPFTP Client
If you haven't already, you will need to download the BPFTP Client application and install it. The program is free to download and use, fully functional, for 30 days. Which should give you plenty of time to decide if it is right for, like so many others have since 1997.
To download, go to this page: http://bpftp.com/products/bpftpclient/windows/download and click on the Click here for free download link at the bottom. This will open another page and trigger the download automatically as seen in the picture below. Simply select to save the download you are offered, choose somewhere you can access easily such as your Windows desktop.

Installing
After the download has completed you should have an icon named bpftpclient_install-XXX.exe (the XXX will vary by version, you now have the latest) on your desktop as below.

To start the installation process, double click (click twice with the left mouse button) on the icon. This will open the installer. You can read the installation information, or safely click next 5 times, then the install button and once done the finish button. By default, unless you unchecked the box on the last window, BPFTP Client will now launch.

First Look
The first time your run BPFTP Client it will give you a window like the one below. We'll explain the different parts f it as we may your first connection to an FTP site. But basically the window is divided up into 4 panes:
- Log Window Pane: Shows your FTP transfer activity. Can mostly be ignored. [Top]
- Local Window Pane: Shows the files on your computer. [Middle-Left]
- Remote Window Pane: Shows the files on the FTP Server you are connect to. [Middle-Right]
- Queue Window Pane: Shows the files you have queued to upload/download before they are transferred. [Bottom]

The Site Manager
The first thing you need to do when wanting to connect to an FTP site is enter the connection details. You can do this into the "quick connect" bar near the top of the main BPFTP Client window if you want but if you are going to be connecting multiple times then you should go to the Site Manager, where you store your FTP site bookmarks.

You open the sitemanager by pressing the icon that looks like an open book with arrows on it on the main toolbar to the top of the BPFTP Client window. The window below will pop up.

In this window are a number of empty boxes, some are necessary to make a connection, some are optional. Basically you fill out the boxes then click the add/update button and you FTP site information is saved.
In our example, below is listed the information you should enter into each box.
- Site Name: my first connection
- Site Address: learnhow.bpftp.com
- Port: 2121
- Login: learnhow
- Password: bpftp
- Initial Local Directory: Click browse and select a directory on your computer with some files to test with.
- Initial Remote Directory: Leave this blank.
When done your site manager will look like this, once it does press the add/update button.

Connecting
Now just press the connect button which will have become available when you added the site. The Site Manager window will close and BPFTP will, if you entered the information correctly, connect. The first thing you will see if so is another window pop up as below. This is the "welcome message" from the FTP server, just click OK.

Once past the welcome message you will see BPFTP Client's main window again and it will look similar to the picture below. The Log, Local and Remote windows panes are no longer blank. In the Log Window is some technical "stuff" from the FTP server about your connection (all but expert users can ignore this). More importantly, in the middle-right window pane, the remote pane, you can now see the files on the FTP Server you just connected to. In the middle-left pane you should see the files in the directory on your own PC that you selected above.

Changing Directories
Just like on your own computer, files on an FTP Server are arranged into folders. often when you first login you will not be in the folder you need to be. For instance many webhosts have a directory named "www", "htdocs", "public_html" or similar which is where any files you wish to appear on your website must go. This is the case with our example. To change directory you need to double click on the yellow folder icon with the word "public_html". BPFTP Client will now change the directory. You will see some text scroll up the top log window and in the remote window where you just clicked, a new file listing will appear as in the picture below.

Uploading
Uploading is the process of transferring a file from your PC to the FTP Server. It is very easy. Simply select a file (or folder) from the local (middle-left) window which lists files on your PC by clicking on it and holdng you rmouse button down (the text around the file name will turn grey) then drag the file to the remote window to the right. Just keep your fnger down on the left mouse button as you drag and let go when the file is anywhere over the middle-right or remote window. Just like moving a file in Windows. Once done the queue window pane will change as below. For testing purposes we suggest selecting a small file, we will delete it from the FTP Server in a later step.

If you look at the queue window pane at the bottom you will see there is an item in it. An arrow (pointing from left to right, local to remote, meaning upload) and then the file name o the file you just dragged. This file has not yet been transferred. It is in the queue waiting. At this point you could select other files for upload and they too would apear in the queue so you could transfer them all in one go. For our example we will just stick to one file.
To complete the uploading look at the toolbar of icons above the queue listing. The icon we want is the first on the left, the folder with a green arrow on it. All you need to do is click once on this and BPFTP Client will transfer the files.

After uploading you will see the contents of the remote window pane change again. You should see the file you just uploaded listed there as shown below.

Downloading
Downloading is the process of transferring files from a remote FTP Server to your local computer. It is the mirror image of uploading. It is accomplished in the same way. For our example we suggest you change your local directory (select the right most icon of three on the local middle-left window pane and a normal Windows file browser window will pop up, select your desktop) to your desktop. Then using the same process as uploading, but in reverse, drag the file you just uploaded from the remote window to the local. Then start the download transfer by clicking on the queue toolbar button again.

Once done the queue will be empty and your file you uploaded, and now downloaded, will appear in your local window again. if you selected your desktop you can switch away from BPFTP client to your desktop to confirm the file is definitely there and that you have succeeded! We'll now delete the file from the server you uploaded. (Uploading and downloading a file does not remove a file and put it somewhere else, it merely copies it so the original is still there.)
Deleting
To delete a file from the server, you simply click on the file name and press the Delete key on your keyboard as if highlighting text to delete it in a word processor document. Again the file will queue, not actually delete. So just press the queue action button to finalise it. BPFTP Client will do its thing and the file will have disappeared from the remote window.

We're back where we started and our lesson on your first connection is done, congratulations!
Menus
The top menu items give you access to much of the functionality and options of BPFTP Client. The function of each item is described below if it is not apparent from the name.

- File
- New Window (Ctrl+N)
- Queue Load
- Queue Save As
- Exit (Ctrl+Q)
- Commands
- Refresh Directory
- Connect
- Disconnect (Ctrl+D)
- Abort
- Start Transferring (Ctrl+G)
- Cache Entire Structure
- Fast
- Slow
- Custom Command (Ctrl+U)
- Bookmarks
- Bookmark/Site-Manager (Ctrl+S)
- Bookmark Current Site (Ctrl+F)
- Import Site List
- Cute FTP
- WS_FTP
- Flash FXP
- Text File
- FTP Explorer
- Export Site List
- Language
- English
- Get New Language
- Tools
- General Options
- Download Options
- ASCII Files
- Show/Hide Progress Window (Ctrl+W)
- Enter URL (Ctrl+E)
- Help
- BulletProof FTP Client Help
- Frequently Asked Questions (FAQ)
- What is my IP
- Purchase/Register BPFTP
Window Panes
The 4 Window Panes within the main BPFTP Client Window each server a different purpose.
Local Window
Labelled "Files on your Computer" this pane shows just that, your local files. For choosing which to upload, or where to download files from the FTP Server.
If you select a file, or the local window and right click with your mouse you will receive a number of options as below.
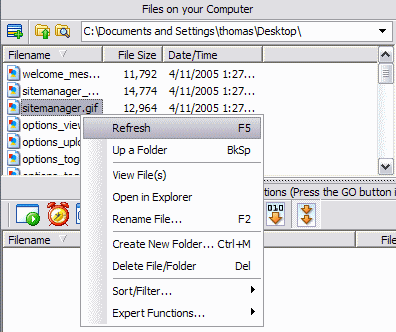
- Refresh (F5)
- Up a Folder (BkSp)
- Open in Explorer
- Rename File (F2)*
- Create New Folder (Ctrl+M)
- Delete File/Folder (Del)*
- Sort/Filter
- Sort by File Extension
- Set Filter
- Expert Functions
- Monitor Folder
- Manual Upload
*Only when on a file/folder.
Local Window File Listing Headings
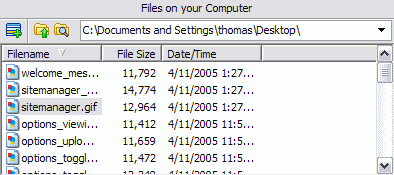
- Filename
- File Size
- Date/Time
Remote Window
Labelled "Files on FTP Server" when logged into an FTP Server this window shows the contents of the current remote directory.
If you select a file, or the remote window and right click with your mouse you will receive a number of options as below.
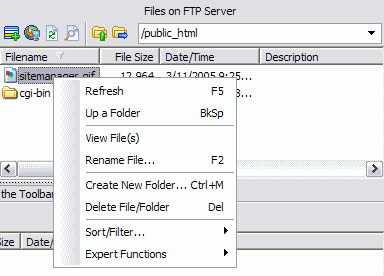
- Refresh (F5)
- Up a Folder (BkSp)
- View File(s)**
- Rename File (F2)*
- Create New Folder (Ctrl+M)
- Delete File/Folder (Del)*
- Sort/Filter
- Sort by File Extension
- Set Filter
- Expert Functions
- Copy to Clipboard (Ctrl+C)
- Move To
- Manual Download
- Partial Download
- Change Attributes
- Recursive Delete
*Only when on a file/folder.
**Only when on a file.
Remote Window File Listing Headings
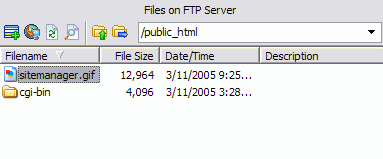
- Filename
- File Size
- Date/Time
- Description
- Attributes
Queue Window
Labelled "Queued Actions" this window shows any queued uploads, downloads or file deletes.
If you select a queued file, or the queue window and right click with your mouse you will receive a number of options as below.
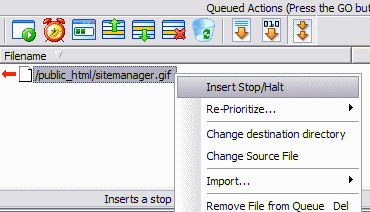
- Insert Stop/Halt
- Reprioritize*
- Move to Top
- Move to Bottom
- Move to Clipboard (Shift+Del)
- Change Destination Directory*
- Change Source File*
- Import
- Import Upload List
- Import Download List
- Remove File from Queue (Del)*
- Clear Queue (Ctrl+Del)
*Only when on a file/folder.
Queue Window Listing Headings

- Filename
- File Size
- Date/Time
- Destination
Log Window
The log window shows the raw FTP activity of your connection. If you select the log window and right click with your mouse you will receive a number of options as below.

- Copy Selected to Clipboard (Ctrl+Ins)
- Copy All to Clipboard
- Clear
Toolbars
Above each Window pane is a toolbar with icons which allow you to quickly do common tasks associated with these Windows
Main Toolbar
This toolbar, with large icons and positioned at the top of the window, effects the whole BPFTP Client window. The use of each icon is described below.

- Connect to FTP Server.
- Disconnect from FTP Server
- Abort Current Operation
- Clear All
- Bookmark/Site Manager
- Bookmark Site
- Enter URL
- Options
- File View
- Large Icons
- Small Icons
- Lists
- Details
Quick Connect Toolbar
This toolbar is without icons, just text entry boxes and is directly below the main toolbar at the top of the BPFTP Client window. Here you can enter the details for an FTP server and hit the return key to connect to it without having to enter or store the information in the site manager.
- Host
- Port [21]
- Login
- password
Local Window Toolbar
The toolbar at the top of the local window pane (middle-left) with small icons has 3 functions.

- Queue for Upload
- Go Up a Directory
- Folder Browse
Remote Window Toolbar
The toolbar at the top of the remote window pane (middle-right) with small icons has 6 functions.

- Queue for Download
- Custom Command
- Refresh Listing
- Find File(s)
- Go Up a Directory
- Manually Change Dir
Queue Window Toolbar
This toolbar, with large icons and positioned at the top of the window, effects the whole BPFTP Client window. The use of each icon is described below.

- Action Queue
- Schedule Queue
- Show/Hide Progress Window
- Move Up Queue
- Move Down Queue
- Delete From Queue
- Clear Queue
- ASCII Transfer Mode
- Binary Transfer Mode
- Autosense ASCII/Binary Mode
Options
BPFTP has extensive options. All of the options prefixed with "Options-" are found under the Tools menubar under the general options item, or by pressing the two cog symbol on the main tool bar this. The Download Options are found under that name via the Tools menubar alone, as are the Ascii Files options.
Any items marked with a [v] are a checkbox that is selected by default. Anything else in square brackets beside an option name is the default value. Where it is not immediately obvious what an option does it is explained.
- Options-General
- Options-User Interface
- Options-URL Handling
- Options-Operation
- Options-Events
- Options-Viewing
- Options-Speed
- Options-Other
- Options-Fonts
- Options-Uploading
- Options-FTP Proxy
- Options-HTTP Proxy
- Options-Firewall (PASV,NAT)
- Download Options
- ASCII Files
Options-General
This section of the General options has a number of basic settings. Most can be left alone though if you wish to connect to anonymous FTP sites you may wish to enter an email address under that item.
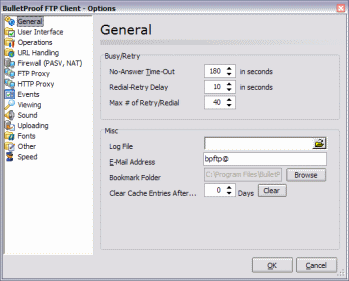
- Timeout (seconds) [180]: If Bullet Proof FTP waits this long and nothing happens then it will automatically reconnect to the server and continue any file transfers. This is very useful for times when the server doesn't disconnect you, but the transfer just stalls.
- Retry Delay (seconds) [10]: This is the delay between reconnections to a site.
- Maximum Number of Retries [40]: This is the maximum number of times Bullet Proof FTP will attempt to reconnect to a site before giving up and going on to the next one.
- Cache Expires After [4]: When Bullet Proof FTP connects to a site and lists a directory, that listing is stored locally in a cache file so that the next time you go to that directory, you won't have to wait for the listing to appear. This sets the expiry on the cache - when it expires, it is removed and the listing will be transferred again. This is so you can keep up to date with files on the remote server.
- Update Now
- Log File: This sets the location of the log file. The log file is just a copy of what appears in the log window.
- Email Address [bpftp@]: This setting will be used as the default password when you log into an anonymous site. Theoretically you should enter your email address as a matter of courtesy to the FTP site administrator, but this doesn't happen much these days. You can set this to whatever you like, but make sure that it follows a basic email address format (ie user@host.extension) because a lot of ftp servers do a basic check.
- Sitelist Directory
Options-User Interface
This section of the General options has settings related to how BPFTP displays information from the server.
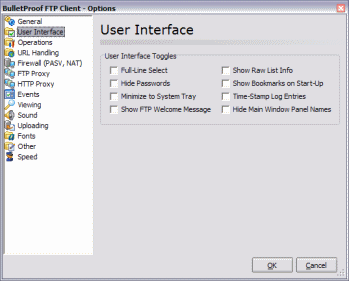
- Full Line Select: Allows you to click on anywhere in a line to select that line, instead of just the filename.
- Hide Passwords [v]
- Minimise to Tray: If this is selected then BPFTP will appear in the system tray and remove itself from the taskbar when minimize
- Popup Welcome Message [v]
- Shaded Caption
- Show Raw List Info:: If enabled BPFTP will show the raw list information that is received from the server. There's no real need to look at this unless you're an advanced user, or BPFTP is having problems parsing the list information received from the server.
- Show Sitelist On Startup
- Timestamp Log Entries
Options-URL Handling
This section of the General options has settings related to how BPFTP deals with HTTP (Web) addresses it finds in your clipboard after you copy them from a webpage or email or other.
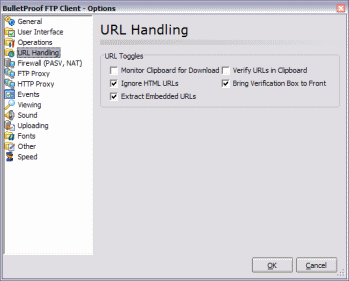
- Monitor Clipboard for URLs: If this is enabled then BPFTP will keep an eye on the clipboard, and if it sees a URL (anything beginning with http:// or ftp://) in it then it'll automatically remove it from the clipboard and transfer the file that it refers to. If it's already transferring when it detects a URL then it'll be queued for later retrieval.
- Ignore HTML URLs [v]: The most common URLs that you'd like to ignore would probably be HTML (web page) URLs. While BPFTP can download a small text file with no problems, more than likely you'd want to paste the URL into your browser so you can look at the web page. Just in case you're wondering exactly what BPFTP ignores - the 2 wildcards are *.*htm* and http://*/ .
- Extract Embedded URLs [v]: This will extract URLs embedded within URLs - this is useful for download sites which use a redirection CGI to download files. BPFTP will usually be able to handle the redirection anyway but with this enabled it'll be quicker.
- Verify URLs in Clipboard: The 'monitor clipboard' feature is very useful, but sometimes you might want to copy a few urls into the clipboard and you don't want BPFTP to touch them. To save turning off clipboard monitoring altogether you can choose to verify every URL that BPFTP detects and either modify or ignore it.
- Bring Verification Box to Front [v]: This will simply pop up the verification box in front of whatever you're doing at the time when BPFTP detects a URL in the clipboard. It saves you having to manually bring BPFTP to the front to accept or ignore the URL.
Options-Operation
This section of the General options has settings related to general operatio of the FTP client when connected.
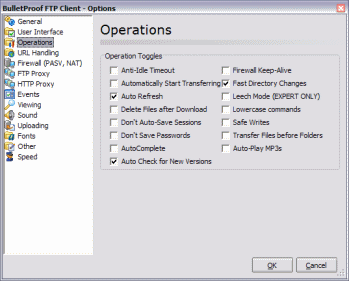
- Anti idle Timeout: If enabled, BPFTP will send random commands to the FTP server at periodic intervals in order to prevent it from disconnecting you for inactivity. The delay between commands is taken from the 'timeout' setting.
- Automatically Start Transferring
- Auto Refresh [v]: Auto refresh will automatically refresh the remote listing if any modifications have been made to it.
- Delete Files After Download</li>
- Don't Autosave Sessions: BPFTP by default saves session files automatically every time they're modified, if for some reason you don't want to do this then enable this option.
- Don't Save Passwords
- Autocomplete
- Auto Check For New Versions [v]
- Firewall Keep Alive
- Fast Directory Changes [v]: If this is enabled then Bullet Proof FTP will change directories very fast if the directory you're changing to is cached. Unfortunately this doesn't work with all servers (though sites it doesn't work with are rare), so if you have any problems changing directories then disable this.
- Leech Mode: This is used for FTP sites that allow you to download a certain amount before having to upload or reconnect. In this mode, Bullet Proof FTP will disconnect when your credit runs out, reconnect and continue downloading from where you left off. This will not bypass FTP sites where you have to upload before being able to download anything. If this is disabled and your credit runs out, BPFTP will look through your transfer queue for the first item queued for upload, and upload it. This way you only have to upload just enough to enable you to download what you want.
- Lowercase Commands
- Safe Writes: With this option enabled, BPFTP will write data to disk and close the file with each block of data that is received, if disabled Windows will cache writes. If enabled, in the event of a crash, its very unlikely that you'll lose any data, however it does make writes a little slower. Disabling obviously makes the writes faster. You'll only notice a slowdown though if you have a fast (non modem) connection, or you're downloading large (50MB+) files.
- Transfer Files Before Dirs: If enabled, BPFTP will look through the transfer queue for files and download them, leaving any queued directories until no files are left in the queue. This will keep the queue size to a minimum and help conserve resources, very useful for large download queues.
- Autoplay MP3s
Options-Events
This section of the General options allows you to defines what BPFTP Client does after transferring all files in a queue and on connecting so you can automate the file transfer process.
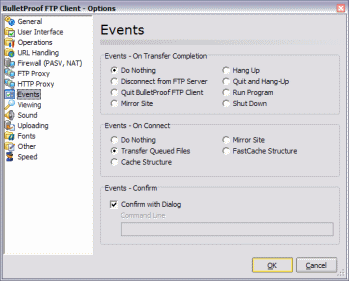
- On Transfer Completion
- Do Nothing [v]
- Disconnect from Site
- Quite BulletProof FTP Client
- Mirrorsite
- Hang Up
- Quit and Hangup
- Run Program
- Confirm With Dialog
- Cmd Line
- On connect
- Do Nothing [v]
- Transfer Queued Files
- Cache Structure
- Mirror Site
- FastCache Structure
Options-Viewing
This section of the General options defines how BPFTP handles viewing files within the local and remote windows when you click on them.
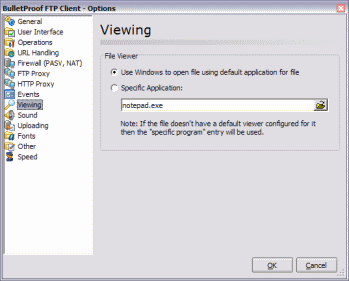
- File Viewer
- Default Viewer Based on File Extension [v]
- Specific Program
- Sound Options
- Connect Sound
- Server Disconnect Sound
- Transfer Completion Sound
Options-Sound
This section of the General options allows you to select sound files to play on various events.
Options-Speed
This section of the General options allows you to choose the maximum speed BPFTP will transfer files at so you can leave some bandwidth free for other applications if you wish.
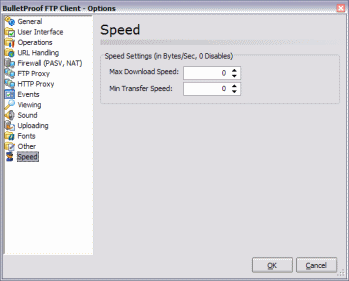
- Maximum Download Speed
- Maximum Transfer Speed
Options-Other
This section of the General options allows you to choose the maximum speed BPFTP will transfer files at so you can leave some bandwidth free for other applications if you wish.
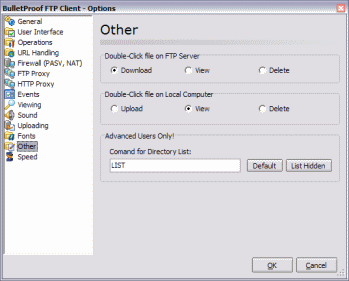
This section of the General options has a couple of miscellaneous settings.
- What to do When you Double Click on a File
- Local
- Upload
- View [v]
- Delete
- Remote
- Download [v]
- View
- Delete
- Local
- Advanced Users Only!
- List Command [LIST]
- Default
- List Hidden
Options-Fonts
This section of the General options lets you choose which fonts you want BPFTP Client to use in various windows panes.
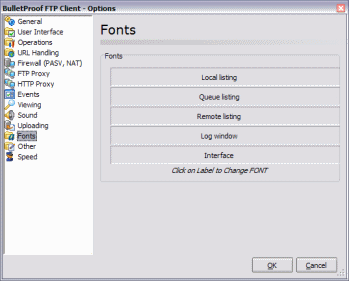
- Local Listing
- Queue Listing
- Remote Listing
- Log Window
- Interface
Options-Uploading
This section of the General options has options related to how BPFTP Client deals with files when uploading.
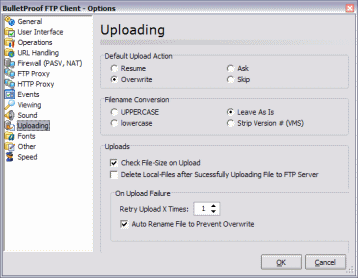
- Default Upload Action
- Resume
- Overwrite
- Ask [v]
- Skip
- Filename Conversions
- UPPERCASE
- lowercase
- As Is
- Strip Version # (VMS)
- Check Filesize on Upload [v]
- Delete Files After Successful Upload
- Retry Failed Uploads [1] Times
- Auto Rename Each Time
Options-FTP proxy
This section of the General options allows you to enter settings for an FTP firewall if you require this to connect to external FTP Sites. By default Passive mode is on and this should be enough to connect from most computers to most FTP Servers.
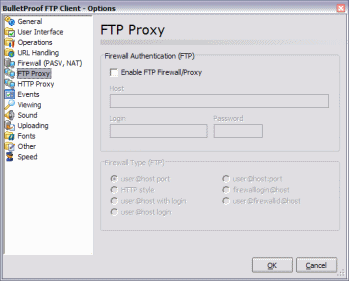
- Enable FTP Firewall/Proxy
- Host
- Login
- Password
- Firewall Type
- user@host port [v]
- HTTP Style
- user@host with login
- user@host login
- user@host:port
- firewalllogin@host
Options-HTTP Proxy
This section of the General options allows you to enter HTTP/Web firewall settings for BPFTP to use when retrieving non-FTP files.
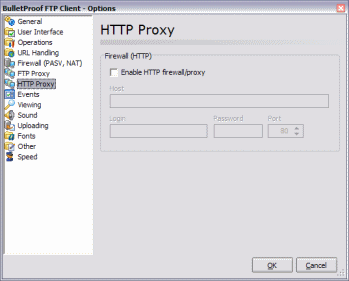
- Enable HTTP Firewall/Proxy
- Host
- Login
- Password
- Port [80]
Options-Firewall (PASV,NAT)
This section of the General options allows you to manually set what IPs and Ports BPFTP uses for connections.
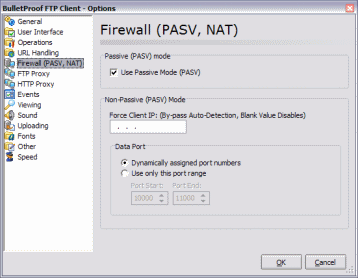
- Use Passive Mode (PASV) [v]
- Force Client IP:
- Data Port
- Dynamically Assigned Port Numbers [v]
- Use Only this Port Range
- From [10000]
- to [11000]
Download Options
The download options give you complete control over how BPFTP deals with downloading files when it finds a file of the same name exists in the download location. While there appear to only be three sets of options, the first two ("...File Size" and "...File Date/Time") combine to make 9 different settings which you can set with a different ("Then") action. Select an item from "If the Destination File Size is" then one from "And the Destination File Date/Time is" then one from the "Then" action to take section. You can do this for all 9 different combinations of file sizes and date/times.
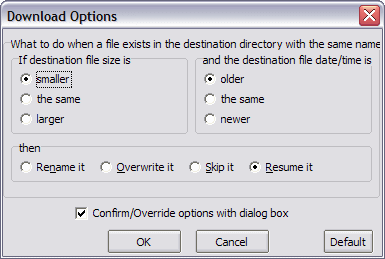
- If the Destination File Size is
- smaller
- the same
- larger
- And the Destination File Date/Time is
- older
- the same
- newer
- Then
- Rename It
- Overwrite It
- Skip It
- Resume it
- Confirm/Override Options with Dialog Box
ASCII Files
These options simply allow you to set which file types BPFTP Client will transfer in ASCII (rather than Binary) mode by default.
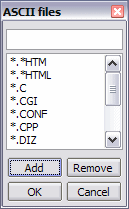
- *.*HTM, *.*HTML, *.C, *.CGI, *.CONF, *.CPP, *.DIZ, *.NFO, *.PAS, *.PHP, *.PL, *.TXT
- Add
- Remove
Site Manager
The sitemanager is where you store your FTP bookmarks for sites you connect to often. It can be accessed from the book with two arrows icon on the main toolbar or the Bookmarks menu bar.
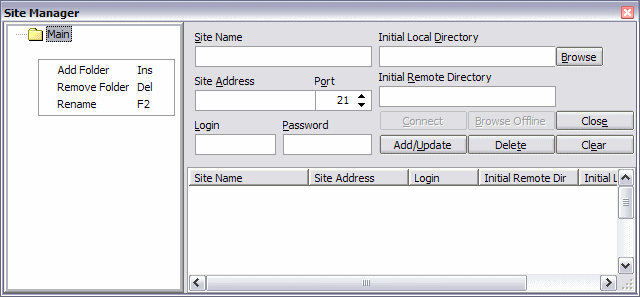
- Site Name
- Site Address
- Port [21]
- Login
- Password
- Initial Local Directory
- Initial Remote Directory
- Connect
- Browse Offline
- Close
- Add/Update
- Delete
- Clear
- Main
- Add Folder
- Remove Folder
- Rename
Keyboard Shortcuts
A number of operations within BPFTP Client can be done with a keyboard shortcut for speedy operation, these are listed here.
- New Window (Ctrl+N)
- Exit (Ctrl+Q)
- Disconnect (Ctrl+D)
- Start Transferring (Ctrl+G)
- Custom Command (Ctrl+U)
- Bookmark/Site-Manager (Ctrl+S)
- Bookmark Current Site (Ctrl+F)
- Show/Hide Progress Window (Ctrl+W)
- Enter URL (Ctrl+E)
- Refresh (F5)
- Up a Folder (BkSp)
- Rename File (F2)
- Create New Folder (Ctrl+M)
- Delete File/Folder (Del)
- Copy to Clipboard (Ctrl+C)
- Move to Clipboard (Shift+Del)
- Remove File from Queue (Del)
- Clear Queue (Ctrl+Del)
- Copy Selected to Clipboard (Ctrl+Ins)

